Title: Developing a Single Page App with Flask and Vue.js Author:
Michael Herman Origin:
https://testdriven.io/blog/developing-a-single-page-app-with-flask-and-vuejs/#vue-setup
Note:
原作者用的是Vue2,我用的是Vue3,但是在本应用中区别不大。
本文指示了如何基于Flask+Vue.js构建一个支持基本CRUD操作 (增删查改)
的应用。 (本文只大致翻译到了打通前后端的部分。后续内容可在原博客 查看。)
1. Flask and Vue.js
1.1 什么是Flask ?
Flask是一个简单而强大的基于Python的微型Web框架,非常适合于构建表现层状态转移API
(RESTful APIs)。 像 Sinatra (Ruby) 和 Express (Node)
一样,它非常小巧灵活,所以你可以从小开始按照需求逐步构建一个复杂的应用。
1.2 什么是Vue.js ?
Vue是一个开源的JavaScript框架,用于构建用户界面。
它采用了React和Angular的一些长处。也就是说,与React和Angular相比,它更加平易近人,所以初学者可以快速上手。
它也同样强大,所以它提供了你创建现代前端应用程序所需的所有功能。
2. Flask Setup
首先准备好项目根目录 flask-vue-crud。
1
2
$ mkdir flask-vue-crud $ cd flask-vue-crud
在文件夹 flask-vue-crud 中,创建一个新的目录
server。 然后,我们在 server
目录下创建并激活虚拟环境。
1
2
3
$ python -m venv env $ env\Scripts\activate.bat (env)$
安装Flask和Flask-CORS扩展。
1 (env)$ pip install Flask==1.1.2 Flask-Cors==3.0.10
在 server 目录下创建 app.py。
1
2
3
4
5
6
7
8
9
10
11
12
13
14
15
16
17
18
19
20
21
22
23
from flask import Flask, jsonifyfrom flask_cors import CORSDEBUG = True app = Flask(__name__) app.config.from_object(__name__) CORS(app, resources={r'/*' : {'origins' : '*' }}) @app.route('/ping' , methods=['GET' ] def ping_pong (): return jsonify('pong!' ) if __name__ == '__main__' : app.run()
为什么需要安装 Flask-CORS ?
为了进行跨源请求 (cross-origin
requests)——例如,来自不同协议、IP地址、域名或端口的请求——因此需要启用跨源资源共享(CORS,
Cross Origin Resource Sharing)。Flask-CORS为我们处理这个问题。
值得注意的是,上述设置允许所有路由的跨源请求,来自任何域、协议或端口。在生产环境中,你应该只允许来自前端应用程序所在域的跨源请求。——Flask-CORS文档
接下来,我们运行 app.py:
然后我们可以在浏览器的 http://localhost:5000/ping
看到测试的结果。页面上应该出现:
于是我们就可以在命令行用 Ctrl+C 杀死服务器,并回到项目的根目录
flask-vue-crud, 准备Vue的设置。
3. Vue Setup
Note: 作者采用的是Vue2,这里使用的是Vue3.
我们将采用 Vue CLI来生成一个定制的项目模板。 全局安装。
1 $ npm install -g @vue/cli@4.5.11
然后,在项目根目录flask-vue-crud
下,运行下列命令初始化一个名为 client 的 Vue 项目。
需要手动选择一些选项。
1
2
3
4
5
Vue CLI v4.5.11 ? Please pick a preset: (Use arrow keys) Default ([Vue 2] babel, eslint) Default (Vue 3 Preview) ([Vue 3] babel, eslint) ❯ Manually select features
选择 Manually select features.
接下来,选择Choose Vue version, Babel,
Router, 和 Linter / Formatter。
1
2
3
4
5
6
7
8
9
10
11
12
13
Vue CLI v4.5.11 ? Please pick a preset: Manually select features ? Check the features needed for your project: ❯◉ Choose Vue version ◉ Babel ◯ TypeScript ◯ Progressive Web App (PWA) Support ◉ Router ◯ Vuex ◯ CSS Pre-processors ◉ Linter / Formatter ◯ Unit Testing ◯ E2E Testing
1
2
3
4
5
6
7
8
9
Vue CLI v4.5.11 ? Please pick a preset: Manually select features ? Check the features needed for your project: Choose Vue version, Babel, Router, Linter ? Choose a version of Vue.js that you want to start the project with 3.x (Previe) ? Use history mode for router? (Requires proper server setup for index fallback in production) Yes ? Pick a linter / formatter config: Airbnb ? Pick additional lint features: Lint on save ? Where do you prefer placing config for Babel, ESLint, etc.? In package.json ? Save this as a preset for future projects? (y/N) No
这样项目就构建完成了。
所生成的项目可能包含很多内容,但我们只会 处理
src 目录下的内容和
public目录下的index.html。
文件index.html 将会是 Vue 应用的起点。
其中,有一个id="app"的div元素。
这是一个占位符,Vue会将所生成的HTML和CSS附在上面,以产生UI。
接下来,我们来看看 src目录下的构造。
1
2
3
4
5
6
7
8
9
10
11
12
client/src ├── App.vue ------------ 根组件 (Root component)。其他所有组件被渲染的起点。 ├── assets ============= 存放静态资源文件,例如图片和字体。 │ └── logo.png ├── components ========= UI组件的存放目录。 │ └── HelloWorld.vue ├── main.js ------------ App的入口。与根组件 (root component) 一起加载并初始化Vue。 ├── router │ └── index.js ------- URL在此处被定义,并映射到其他组件。 └── views ============== 存储与路由相关的UI组件。 ├── About.vue └── Home.vue
我们来看看 component目录下的HelloWorld.vue
文件。 这是一个单文件组件 (Single File component), 分为 3 个部分:
template : 用于为组件定制HTML。script : 用JavaScript来实现组件逻辑部分。style : 用于CSS定制。
让我们来启动开发服务器。
1
2
$ cd client $ npm run serve
在浏览器中打开 http://localhost:8080
。你应该看到如下的页面。
为了让事情简单一点,我们移除文件夹 client/src/views。
然后,在
client/src/components目录下添加一个叫Ping.vue的组件。
1
2
3
4
5
6
7
8
9
10
11
12
13
14
15
16
<template> <div> <p>{{ msg }}</p> </div> </template> <script> export default { name: 'Ping', data() { return { msg: 'Hello!', }; }, }; </script>
然后,更新
client/src/router/index.js以将/ping映射到刚刚创建的Ping组件。
1
2
3
4
5
6
7
8
9
10
11
12
13
14
15
16
17
import { createRouter, createWebHistory } from 'vue-router' ;import Ping from '../components/Ping.vue' ;const routes = [ { path : '/ping' , name : 'Ping' , component : Ping, }, ]; const router = createRouter({ history : createWebHistory(process.env.BASE_URL), routes, }); export default router;
最后,在 client/src/App.vue
中,移除navigation和样式表。
1
2
3
4
5
<template> <div id="app"> <router-view/> </div> </template>
此时,你应该在http://localhost:8080/ping的页面上看见Hello!。
Error: Expected linebreaks to be 'LF' but found 'CRLF'
linebreak-style Solution:
将所有.eslintrc的'linebreak-style'改成'linebreak-style': ['error', 'windows']。
4. To Connect
the Client-side with the Back-end Side
为了连接前端的Vue应用和后端的Flask应用,我们可以使用 axios 库来发送
AJAX 请求。 首先,我们安装它。
1 $ npm install axios@0.21.1 --save
然后,我们更新组件 Ping.vue 中的 script
部分。
1
2
3
4
5
6
7
8
9
10
11
12
13
14
15
16
17
18
19
20
21
22
23
24
25
26
27
28
<script> import axios from 'axios'; export default { name: 'Ping', data() { return { msg: '', }; }, methods: { getMessage() { const path = 'http://localhost:5000/ping'; axios.get(path) .then((res) => { this.msg = res.data; }) .catch((error) => { // eslint-disable-next-line console.error(error); }); }, }, created() { this.getMessage(); }, }; </script>
在命令行中启动Flask侧的应用。你应该可以在页面上看到pong!.
基本的做法是,当后端返回一个response时,我们将msg设置为response对象的data值。
5. Boostrap Setup
接下来,我们将Boostrap配置到我们的应用上。这是一个流行的CSS框架。
安装
(忽视关于jquery和popper.js的警告。不要把它们添加到你的项目里):
1 $ npm install bootstrap@4.6.0 --save
将Boostrap样式表添加到client/src/main.js。
1
2
3
4
5
6
import { createApp } from 'vue' ;import App from './App.vue' ;import router from './router' ;import 'bootstrap/dist/css/bootstrap.css' ;createApp(App).use(router).mount('#app' );
在client/src/App.vue的样式表部分进行更新。
1
2
3
4
5
<style> #app { margin-top: 60px } </style>
在组件Ping中,使用Button和Container确保Boostrap被正确地配置。
1
2
3
4
5
<template> <div class="container"> <button type="button" class="btn btn-primary">{{ msg }}</button> </div> </template>
运行开发服务器后,你应该看到这样的画面:
接下来,在/components目录下新建Books.vue文件并增加一个名为Books的组件。
1
2
3
4
5
<template> <div class="container"> <p>books</p> </div> </template>
更新路由:
1
2
3
4
5
6
7
8
9
10
11
12
13
14
15
16
17
18
19
20
21
22
23
import Vue from 'vue' ;import Router from 'vue-router' ;import Books from '../components/Books.vue' ;import Ping from '../components/Ping.vue' ;Vue.use(Router); export default new Router({ mode : 'history' , base : process.env.BASE_URL, routes : [ { path : '/' , name : 'Books' , component : Books, }, { path : '/ping' , name : 'Ping' , component : Ping, }, ], });
测试以下两个链接:
http://localhost:8080 http://localhost:8080/ping
然后,我们在Books组件中增添一个Boostrap样式的表格。
1
2
3
4
5
6
7
8
9
10
11
12
13
14
15
16
17
18
19
20
21
22
23
24
25
26
27
28
29
30
31
32
33
34
35
<template> <div class="container"> <div class="row"> <div class="col-sm-10"> <h1>Books</h1> <hr><br><br> <button type="button" class="btn btn-success btn-sm">Add Book</button> <br><br> <table class="table table-hover"> <thead> <tr> <th scope="col">Title</th> <th scope="col">Author</th> <th scope="col">Read?</th> <th></th> </tr> </thead> <tbody> <tr> <td>foo</td> <td>bar</td> <td>foobar</td> <td> <div class="btn-group" role="group"> <button type="button" class="btn btn-warning btn-sm">Update</button> <button type="button" class="btn btn-danger btn-sm">Delete</button> </div> </td> </tr> </tbody> </table> </div> </div> </div> </template>
你应该看到:
现在,我们终于可以开始实现我们的CRUD应用的功能部分了。
6. What are we Building?
我们的目标是设计一个后端表现层状态转移API (RESTful APIs),
由Python和Flask驱动,用于一个单一的资源—— Books。
该API本身应遵循RESTful设计原则,使用基本的HTTP动作:
GET、POST、PUT和DELETE。
我们还将用Vue建立一个前端应用程序,以使用后端API。
7. GET Route
Server
在 server/app.py 中 添加一个书的list。
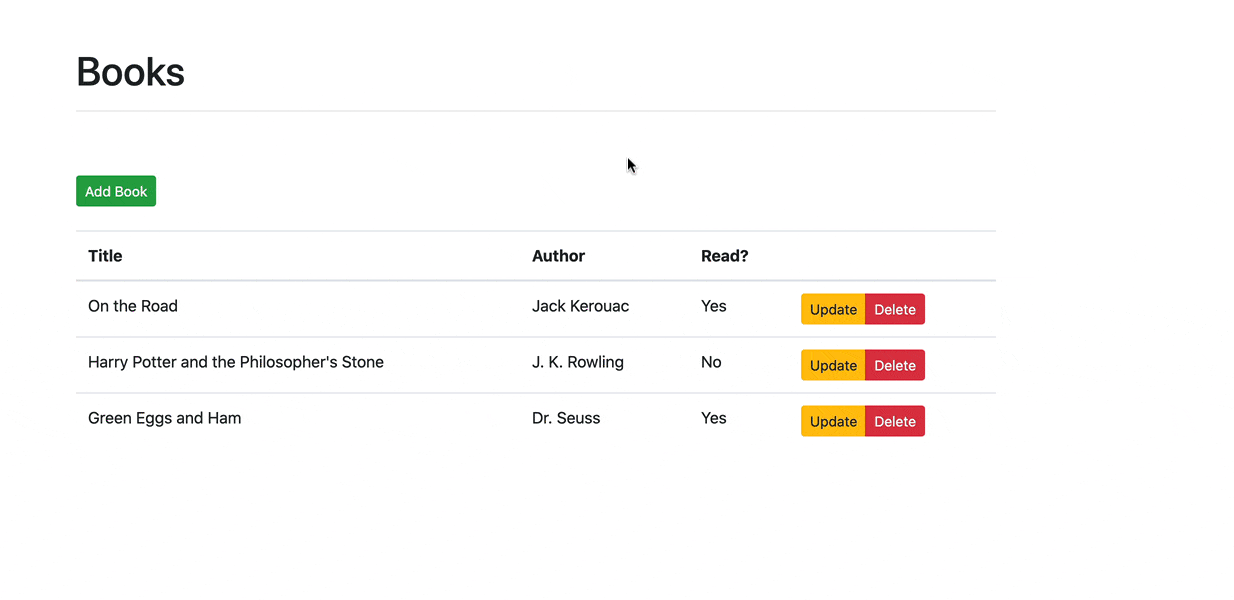
1
2
3
4
5
6
7
8
9
10
11
12
13
14
15
16
17
BOOKS = [ { 'title' : 'On the Road' , 'author' : 'Jack Kerouac' , 'read' : True }, { 'title' : 'Harry Potter and the Philosopher\'s Stone' , 'author' : 'J. K. Rowling' , 'read' : False }, { 'title' : 'Green Eggs and Ham' , 'author' : 'Dr. Seuss' , 'read' : True } ]
并且添加路由handler:
1 2 3 4 5 6 @app.route('/books' , methods=['GET' ] def all_books (): return jsonify({ 'status' : 'success' , 'books' : BOOKS })
此时,运行该Flask
app的话,你应该可以在http://localhost:5000/books看到这个list。
Client
更新组件:
1
2
3
4
5
6
7
8
9
10
11
12
13
14
15
16
17
18
19
20
21
22
23
24
25
26
27
28
29
30
31
32
33
34
35
36
37
38
39
40
41
42
43
44
45
46
47
48
49
50
51
52
53
54
55
56
57
58
59
60
61
62
63
64
65
66
<template> <div class="container"> <div class="row"> <div class="col-sm-10"> <h1>Books</h1> <hr><br><br> <button type="button" class="btn btn-success btn-sm">Add Book</button> <br><br> <table class="table table-hover"> <thead> <tr> <th scope="col">Title</th> <th scope="col">Author</th> <th scope="col">Read?</th> <th></th> </tr> </thead> <tbody> <tr v-for="(book, index) in books" :key="index"> <td>{{ book.title }}</td> <td>{{ book.author }}</td> <td> <span v-if="book.read">Yes</span> <span v-else>No</span> </td> <td> <div class="btn-group" role="group"> <button type="button" class="btn btn-warning btn-sm">Update</button> <button type="button" class="btn btn-danger btn-sm">Delete</button> </div> </td> </tr> </tbody> </table> </div> </div> </div> </template> <script> import axios from 'axios'; export default { data() { return { books: [], }; }, methods: { getBooks() { const path = 'http://localhost:5000/books'; axios.get(path) .then((res) => { this.books = res.data.books; }) .catch((error) => { // eslint-disable-next-line console.error(error); }); }, }, created() { this.getBooks(); }, }; </script>
当组件初始化完毕,生命周期钩子(lifecycle hook)
created将会触发函数getBooks(),
以从我们刚刚设置的后端处获取Books。
在该模板中,我们通过v-for指令遍历 books
的list,在每次遍历中创建一个新的表行。
索引值被用来作为key。
最后,v-if被用来呈现Yes或No,表明用户是否已经阅读了这本书。
8. Bootstrap Vue
在下一节中,我们将使用一个modal来添加新书。 我们将为此添加Bootstrap
Vue库,它提供了一套用基于Bootstrap的HTML和CSS进行样式定制的Vue组件。
这个库目前不支持Vue3,所以没有再搞了。